Showing posts with label Cards. Show all posts

Monday, April 7

All Things Spring Challenge with 3 Girl JAM


HAPPY MONDAY FRIENDS!


I have a short but sweet post for you today!

For my Designer Day with 3 Girl JAM, I created a bright and cheery card to follow the theme for the current 3 Girl JAM 3GJ Challenge Blog.

The theme is All Things Spring with Ribbon.

I used the Mistletoe Green Crinkle Ribbon to give a feel of soft spring grass along the bottom of my card.  I love pleating this ribbon for many different effects.  I love the grass look it gives here.


Other products used:
Yellow Card Base -- David Tutera Celebrate Card Set - Brights

Frame layers -- Recollections card stock (various colors)  
Frames cut using Shapez Frame 2 Die by Spellbinders/Xyron
Butterflies cut using Shapez Butterfly Die by Spellbinders/Xyron
Design on Butterflies was made using Untiy Stamp Co. Chicken Wire Background stamp by Christy Tomlinson then heat embossed
Sentiment from Unity Stamp Co. "...everything wonderful" set by Lisa Arana
Inks used:  Colorbox Imperial Purple, Colorbox Blossom Pink, Ranger Sunshine Yellow, American Crafts Powder Blue, & American Crafts Apricot 


Remember 
to 
Keep Crafting, 
Because 
♫ CRAFTING ♫ 
♫ ROCKS ♫ 
\m/-_-\m/ 
:O) Jessica


Monday, March 24

THANK YOU with 3 Girl Jam Crinkle Ribbon and Flair!!!!


Welcome Blends and 3 Girl JAM Friends!!!!

Happy Monday to all of my friends and readers.  
I am the Designer up at the3 Girl JAM Blog today and I have a quick card to share with you!

The first Day of Spring arrived last week.  Well, as far as the calendar was concerned, it did.  But it is still a frosty morning here in Ohio.

The March Challenge is still going strong with 3 Girl JAM.  The theme is "Yellow, Green and Orange".

I grabbed my scraps and sifted through for the colors of the challenge....


I found a few to work with and quickly created this card!


and 
work perfectly to offer a great Spring Bounce to this card.


I got to play with my new Dies that I received this past week, too!


Here is a link to all the fabulous colors of 3 Girl JAM Crinkle Ribbon:

JOIN THE FUN CHALLENGE
The 3 Girl JAM Challenge for the month of February is
"Yellow, Green and Orange"
3 Girl JAM Challenges

You'll always find LOADS of inspiration at the 3 Girl JAM Challenge Blog!
Stop over for wonderful ideas from the Design Team and all those who are linking up!

We'd love for you to Link your Projects to JOIN THE FUN and for a chance to WIN a Gift Certificate to Shop at 3 Girl JAM!!!!

For more 3 Girl JAM Product and Project Ideas, be sure to check out the 3 Girl JAM Pinterest Boards!

$$$ SAVE $$$
~*~*~ AWESOME DISCOUNT ALERT ~*~*~
Stop by 3 Girl JAM to shop around and place an order
for any of the amazing products that are
a MUST HAVE in your stash!
SAVE 10% OFF Your Order ---Just use the Discount Code JB10 during checkout!!!

Thanks for Stopping In Today


Remember to 
Keep Crafting, 
Because 
♫ CRAFTING ♫ 
♫ ROCKS ♫ 
\m/-_-\m/ 
:O) Jessica

Monday, January 13

One Beautiful Day

!!! HAPPY MONDAY !!!
Blends and 3 Girl JAM-mers

I am happy to be the Design Team Member posting at the 3 Girl JAM Blog today!

It is such an honor for me to be a part of this team from the first Hoorah!  I can't foresee me every departing.  I have a MAD CRUSH on Julie K's Crinkle Ribbon and do not have a desire to seek any type of recourse for the addiction.  (LOL)

Here is the Project I am sharing:

This card took about 10 minutes total to put together, which is quite the record for me.  I tend to always want to add "more" as I craft, but this time, I forced myself to stop sooner.  I would like to try my hand at "speed crafting" a lot this year.  It will help me to get more projects completed and open the door for me to try my hand at tackling more of the fun techniques on my "to-do" list.

I started with a 5.5 in. x 5.5 in. Purple Card Base
--- David Tutera: Celebrate Card Sets
(several of the DT Card sets are available at the Pinque Peacock Discount Hut)

The Peacock Feather patterned paper was cut at 5.25 in. x 5.25 in. and distressed around the edges using my Tim Holtz distressing tool!
--- Recollections Signature Serious PRETTY AS A PEACOCK 12X12 stack
(This was a fabulous gift from my Sweet Crafty Friend Heather F.---thanks Heather :) )

The sentiment tag is also from the same Pretty Peacock stack and was cut to fit within the center of my card.  I simply masked it with a lighter shade of purple card stock then used some foam squares to give it some height on the front of the card.  I love that glittery peacock, don't you?

I used the Ribbon Candy Red Crinkle Ribbon from the 3 Girl JAM Shop to create a sweet Pleated Petal - Elegant Floral for my card.

I love making these flowers for the Pinque Peacock Shop Customers.
It's always fun to use them on my own creations, too.
I adorned the elegant floral with a Pearl Beaded Stick Pin (also from Pinque Peacock) and a few paper roses from another sweet crafty friend, Adele, who sells them!


The Newest 3 Girl JAM Challenge is
ANYTHING GOES with Ribbon!
A Crowd Favorite!
3 Girl JAM Challenges

You'll always find LOADS of inspiration at the 3 Girl JAM Challenge Blog!

Stop over for wonderful ideas from the Design Team and all those linking up!

And, since the challenges have been changed from biweekly to MONTHLY, you will have until January 31st to Link your Anything Goes Projects and JOIN THE FUN!!!!

For more Crinkle Ribbon Crafty Ideas, be sure to check out the 3 Girl JAM Pinterest Boards!

~*~*~ AWESOME DISCOUNT ALERT ~*~*~
Stop by 3 Girl JAM to shop around and place an order
for any of the amazing products that are
a MUST HAVE in your stash!
SAVE 10% OFF Your Order ---Just use the Discount Code JB10 during checkout!!!

Thanks for Stopping In Today

Remember 
to Keep 
Crafting, 
Because 
♫ CRAFTING ♫ 
♫ ROCKS ♫ 
\m/-_-\m/ 
:O) Jessica

Thursday, December 5

Card Making with FUN New Techniques - "Scrap Tag" & "Diamond Fold"

WELCOME TO THE SHAQUE
CRAFTY BLENDS

If you stopped in yesterday, you found out that I have been stepping outside of my comfort zone a wee bit and diving into some fun challenges.  These challenges are really getting the mojo to work some overtime.
I shared a Tri Shutter Fold Card yesterday and have 2 more cards to share with you today.

The first card is a New Technique to me called "Scrap Tag".  It is a great way to use up those small tidbits of scrap paper you have kept in your studios.  The technique was shared by a New Friend I met on Scrapbook Friends and More Crafts (a SUPER FUN group of Crafters on Facebook), Brandy Martin.  I couldn't wait to try it out.

I started by gathering all the scraps I had left over from my Altered Treasure Chest last week.  If you missed that post, check it out HERE.

I sorted them out by patterns and started folding away.  You simply make a quick loop from the strips and adhere the ends together.  Your strips can be skinny, chunky, short, or long.  There really is no wrong way to play with this technique.


One of my favorite things about this style, is the uniqueness of the dimension it gives to the card.  You can choose to fold the "loops flat" or leave them rounded and more puffy.  I opted for something right along the middle of the spectrum for mine.


I grabbed a Christmas Tree Die Cut that I also had laying about (I have to remember to see if I own this die because I want more of these....LOL).  The tree was cut from some Core'dinations card stock I have in Produce Greens.  


Does the sentiment HAPPY HOLIDAYS look familiar?  Well, I had mentioned those in the Altered Treasure Chest post as well. 


 I had cut all the Subway Word Out from a pattern paper, but decided not to use it on that particular project.  I knew it would come in handy soon, though!


I gave the tree a little extra "pizazz" and I embossed it with my Sizzix Swirls folder.


To finish off my card, I added some scraps to the inside and used my Spellbinders Postage Stamp die cuts for the sentiment tag.  The sentiment "Believe in the magic of Christmas" is from the Unity Stamp Co. Kit of the Mon (Aug 2012) called COLOR of the Seasons.  I inked it up using my Tim Holtz Barn Door (red) Distress Ink.


I really love how simple this technique was to play with.  I also enjoyed that I found justification in my "paper hoarding" since I had kept the pieces that were already "perfect size" for this style!


~*~
~*~*~
~*~*~*~*~
~*~*~*~*~*~*~*~
|_|

For my second card, I tried another new Fancy Fold.  This time, it was the Diamond Fold Technique.
And, I am so eager to try more of these now too!


I followed the steps in this wonderful Diamond Fold Tutorial on SCS.

As a self-claimed STACK-A-HOLIC, I was ecstatic to play with my newest DCWV 12x12 Stack, called the Playtime Stack.

It has wonderful images and patterns and 1/2 of the entire collection is Glitter embossed!  eeeeekkkk---SPARKLY!

Here are the sheets I used


and
here are several views of the finished card!

FRONT VIEW-FOLDED IN

The focal image/sentiment is a Unity Stamp Co. set called Birthday Jubilee by artist Joslyn Nielson
I heat embossed it with some Whispers embossing powder--Baby Blue.

I used some of my paper flowers that I ordered from the sweet Adele G. at Glimpz of Memories on Facebook.  I love twirling the wire stem around a skewer to give it the "vine" look sometimes.

FRONT VIEW - SLIGHTLY UNFOLDED

FRONT VIEW - FULLY OPENED

For the side panels (rectangles), I used by Spellbinders Persian Motif dies to cut a few medallions.  I simply sliced them down the center to fit within the panels and to layer a small onto a larger one for added affect.


INSIDE VIEW - FULL

Again, I adorned the sentiment square with some lovely paper flowers from Adele G. at Glimpz of Memories.  The triangles were cut from the the same sheets in the DCWV Stack - the Playtime and a few scraps I had left over from another project.

INSIDE VIEW - CLOSE UP OF SENTIMENT

I {LOVE} all the Birthday Sentiments in the Birthday Jubilee set by Unity!  


They really helped bring my cards to a great Grand Finale!

If you try either of these techniques, I would love to stop by and check out your creations!  Feel free to leave me a link to a post, facebook page, or any other site so I can visit you, too!


Remember 
to 
Keep Crafting, 
Because 
♫ CRAFTING ♫ 
♫ ROCKS ♫ 
\m/-_-\m/ 
:O) Jessica

Wednesday, December 4

Tri Shutter Card for the 12 Challenges of Crafting - Challenge #9

Happy Hump Day Blends!

I am so excited that I have been able to continue on in the 12 Challenges of Crafting with Scrapbook Friends and More Crafts (a SUPER FUN group of Crafters on Facebook).  

It all started with Challenge #1 back on November 1st.  We are given a craft challenge and a very short amount of time in which to complete all the requirements of each challenge.  I have tried techniques and styles of crafting that were on my "Bucket List" and am so encouraged and inspired by all the participants.


The latest Challenge (#9 - Card Marking) ends tonight around 6pm EST.  We are challenged to create 3 separate cards.  We must create a Birthday Card, a Thinking of You Card, and a Holiday Card (any Holiday of choice).  The twists, because there is always an added twist or two, is that we have to be sure the sentiment is stamped or printed on the inside of each card and use 3 separate techniques when we create them.  The admins of the group offered a fabulous list of techniques and links to tutorials out in Crafty Cyberspace.  


I chose to try a Tri-Fold Shutter Card (first time ever....so fun) for my first project.  I opted to finish my Thinking of You card in this style.  Here is the link to the tutorial I followed: Tri Fold Shutter Card Tutorial...please note that when I followed all of the steps in this tutorial, there was a correction needed.  In Step 6, you are instructed to cut 4 small pieces of patterned paper.  The sizes listed were not accurate.  The sizes should have been listed as 1-3/8" x 1-7/8" for those 4 pieces.


I started with a Black Textured Card Stock as my base and followed all of the scoring and slicing steps.  For my patterned paper, I used a Damask Print from my Colorbok 12x12 Neutrals Stack, some K&Company embossed pattern paper in a yellow hue, and plain white card stock.  


To add a little "frill" to the white card stock pieces, I embossed them with my Cuttlebug Swiss Dots folder.  I adhered all of my patterned paper as instructed, with the exception of the middle rectangle.  This was where I was placing my sentiment.

For the sentiment piece, I first stamped the beautiful flowers in Sunshine Yellow Adirondack ink. The flowers are from the Unity Stamp Company stamp set: Insightful Meadows by Donna Downey.  I love Donna's style and art and was so thrilled to play with this set since it had been neglected for a while.  


I couldn't just stop there, I had to stamp the entire flower bouquet onto vellum for the long panel on the inside right side of my card.  I used the same Sunshine Yellow and matted the piece onto white card stock.  


For the inside sentiment verse, I used the Sympathy stamp from the Unity Stamp Company set:  ...everything wonderful created by Unity Artista, Lisa Arana.  Her latest collection of sentiment bundles at Unity have quickly become a FAVORITE for me.  


I still needed to be sure the card was meeting all of the requirements for the challenge so I scoured through my entire Unity Collection of stamps.  I found the "thinking of you" sentiment in one of my large Kits. It is from the Unity Exclusive Stampin' Store Kit - 2009 December collection {Sweet Affections}.  I stamped this using Tim Holtz Distress Ink - Black Soot then matted the small rectangle onto the same black card stock I used for my base.


To embellish my card I used the following products:
some pretty white flowers by Petaloo
yellow flat back pearls from Miriam's Crafting Supplies
3 Girl JAM Crinkle Ribbon (Sunflower Yellow & Tuxedo Black)
and
The rosette was made using a scrap of the pattern paper from the Colorbok stack and a large rhinestone from Miriam's.    

I hope you feel inspired to try to step out of your comfort zone and create a project using a new technique.  I am pleasantly surprised by all of the wonderful techniques and styles that are becoming a "must try again" since playing in these challenges.  

I will try to post some more tutorials and project shares from the previous 8 challenges as well.

Thanks for Stopping by and Stop Back to see all the other projects soon!

Remember 
to 
Keep Crafting, 
Because 
♫ CRAFTING ♫ 
♫ ROCKS ♫ 
\m/-_-\m/ 
:O) Jessica

Friday, October 4

Sorry, It's Been RUFF - A New Challenge STARTS!

Hey there friends.
I had a little time to play and create! 
WHOOP!
I created a fun little card that could be used
for a man or woman
that needs a little PICK UP!


3 Girl JAM Challenges

is kicking off their newest 
Challenge Theme: Fun with Digi's and Ribbons
Starts: TODAY, Ends: Oct. 17th

The Awesome Sponsors for this Challenge are


&


YOU CAN WIN
7 Digi Images from Bugaboo
and
a $10 Gift Certificate
to shop at 3 Girl JAM

I selected the adorable
Sign It - It's Been Rough
image to play with

I started by grabbing some chocolate brown card stock and my vellum.
I printed the image onto vellum and added a small piece of burlap behind the sign.
I used my Whisper Stroke markers to color this adorable K-9, since I haven't yet been able to upgrade to my Crafty Wish List Item - - - Spectrum Noir Markers!

I have been wanting some Spectrum markers for quite some time now.  That strong desire to own them only increases every time I read the wonderful reviews and see the gorgeous projects that are being created using them!

And now, I am ecstatic that I will be able to order them for all my friends and offer them at
AMAZING PRICES, TOO!
Yep, they will be available for order at the Pinque Peacock Discount Hut SOON!

What do you think about that fun Wise Whisper Elegant Floral made from the Fabulous 3 Girl JAM Crinkle Ribbon?  For my Floral, I used
Royal Blue from the Red, White, and Blue Bundle
Holly Berry from the Winter Bundle, and
Hot Chocolate from the Hot and Cold Bundle

If you LIKE IT, scoot on over to the Pinque Peacock Shop and order some today!  You can custom order from any of the wonderful 3 Girl JAM Colors Available


and from a variety of Floral Styles and Embellished Centers, too!


I am so GLAD you Stopped in Today
and now, I ENCOURAGE you to GRAB YOUR DIGI IMAGES AND RIBBON
AND GO CREATE!

Remember 
to 
Keep Crafting, 
Because 
♫ CRAFTING ♫ 
♫ ROCKS ♫ 
\m/-_-\m/ 
:O) Jessica

Tuesday, August 27

WONDERFUL WISHES TO HEATHER LYNN


Hello Sweet Blends!!!!
Today is my Design Team Post at 3 Girl JAM

The Wonderful 3 Girl JAM Crinkle Ribbon never fails to lend it valuable inspiration when I am crafting "under the wire".  With the 4 kids starting school last week, I have found very little time to breath let alone craft.  So when I needed to crunch down in the craft room, I knew I wouldn't be let down when I reached into my scrumptious Rainbow of Crinkle Ribbons to start!

I decided to play along in the current Unity Stamp Company {be inspired} Challenge and to use some of the newest Authentique Paper Collection: Natural, the that I recently won (see images near end of post)!

The ribbon colors I chose for this project included the yummy Hot Chocolate, Antique White, and Gold Crown. 

 I used this crafty opportunity to create a card for my sweet friend, and probably many of yours' as well, Heather Lynn, who battled with a long stay at the hospital recently.  She has made her way back home, but has a lot of recovery ahead of her.  I love her dearly, and wanted to show her how much I AM WISHING for her to be surrounded with ONLY WONDERFUL EVERYTHING.

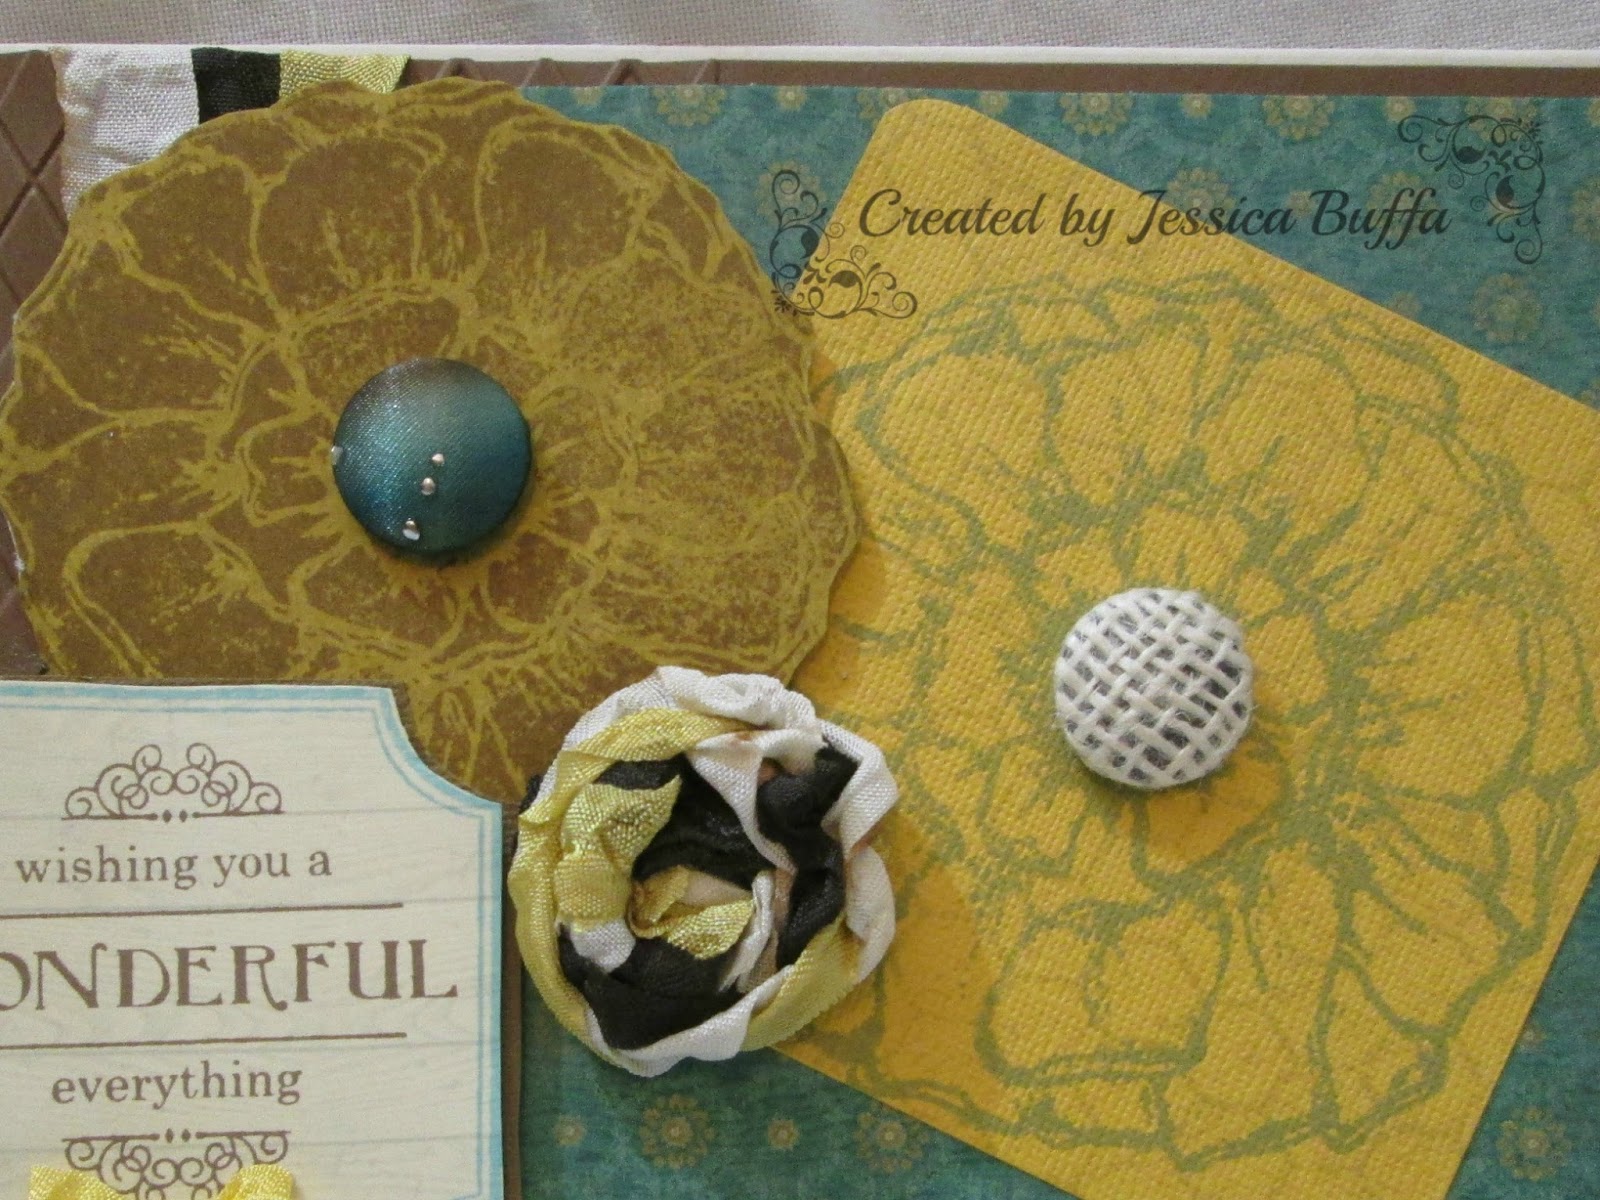
I pleated the ribbon to bring my two papers to a perfect seam, but the beautiful pleats are a bit hidden behind the stamped flower image. The flowers were stamped using the "donna peony" by Donna Downey and Unity Stamps.  Although the images don't show the fun background stamp I used behind the peony on the yellow squared mat, I did ink up the "cooped up notes" background stamp by Christy Tomlinson and Unity Stamp Co. before inking the flower.

To show off more of the 3 Girl JAM Crinkle Ribbon, I created a fun Ribbon Flower using all three colors I mentioned above.
This style flower, a Loop de Loop Elegant Floral,  is available in my shop at Pinque Peacock if you would like to custom order your own from any of the Custom Colors available by 3 Girl JAM.   I am happy to partner with Julie, 3 Girl JAM Owner and Founder, to create these lovely floral embellishments and I really enjoy using them on my own personal projects. (Plus, I have more excuses to play with my FAVORITE CRINKLE RIBBON EVER!  HOO-RAH!)

The Fabric Buttons in the centers of the Donna Peony stamped flowers can also be found at Pinque Peacock.  The Button on the left is a 3/4" Peacock Silk flat back button.  The button on the right is a 3/4" Farm Fresh (natural burlap) flat back button.

 I am happy to partner with Julie, 3 Girl JAM Owner and Founder, to create these lovely floral embellishments and I really enjoy using them on my own personal projects. (Plus, I have more excuses to play with my FAVORITE CRINKLE RIBBON EVER!  HOO-RAH!

And WHAT DO YOU THINK ABOUT THAT SENTIMENT?   SQUEAL!!!
I am soooooo happy that I was able to add the "....everything wonderful" by Lisa Arana to my Unity Stamp Collection.  
I have only owned this set for a short time and am quickly learning it is a HUGE FAVORITE!!!

If you would like to order any of the colors of Crinkle Ribbon I have used on my project today (or more) , I made sure I provided links for you to hop over to the 3 Girl JAM Shop and grab some for yourselves!  Be sure to check out all the other GORGEOUS Products available while you are there!~

Here are some images of all the items I gathered at the start of my project to work with (some I used, and some aren't showing because they joined the process afterwards...LOL)


Remember 
to 
Keep Crafting, 
Because 
♫ CRAFTING ♫ 
♫ ROCKS ♫ 
\m/-_-\m/ 
:O) Jessica

Social Butterfly?

Charity Wings

100% Certified

100% Certified
BAD A$$ Facebook Fan Page

Bill of Rights

Photobucket

Thanks Deb

Recent Visitors