Showing posts with label Lacy Labels. Show all posts

Thursday, September 6

Theme Day Thursday - FALL Foliage

Welcome To


Today's Theme
at My Cricut Craft Room
is
~~~~~Fall Foliage~~~~~

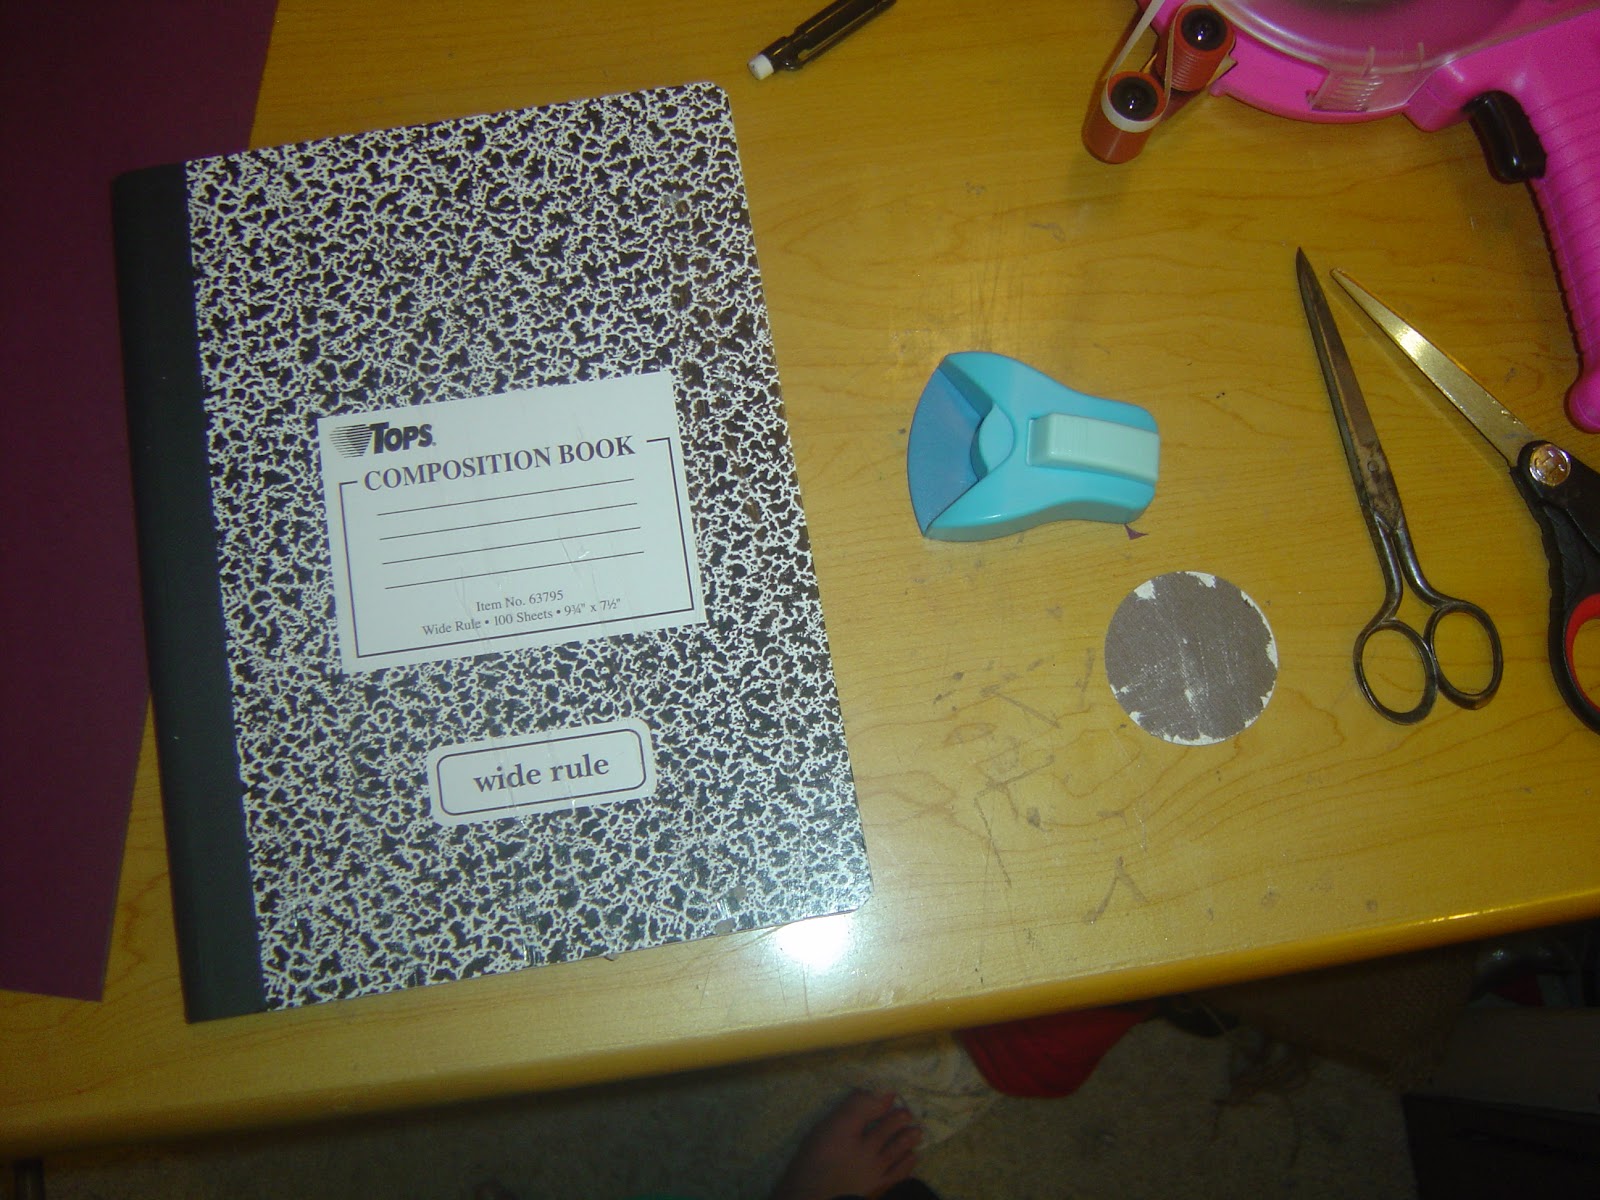
I was lucky enough to find an amazing deal on some
Composition Notebooks last week
at my local Best Buy
10 cents each!!!
Yep, I bought all they had in stock. . . 48 notebooks for $4.80 - SCORE!!!

I was so very eager to start
altering one.
I decided I would use this week's theme
at
My Cricut Craft Room
as my inspiration.
 
 I had an idea for the Title of my Idea Journal
instantly come to mind with the theme
of Fall Foliage, too. . .
sharing that later in the post!


I decided to start by perusing through
ALL of my scrap papers
and choosing out some fun
fall crispy colors to work with
for my Journal.

If you are anything like me, I was able to find
some pre-cut shapes
that were left overs
and some fun pattern papers, too.

I wanted to make a neat flower from a tutorial
that Heather Lynn shared with me last week.
She even gave me some pieces of fabric
to play with as I tried out the technique.
 Thanks Heather!

I took the strip of yellow fabric and adhered
some Frost King double sided adhesive
(this is the roll that comes with window winterizing kits at your
local hardware or DIY store).
I ran my heat gun along the strip before peeling the
paper backing off, for extra "stickiness"
then folded the fabric in half to bring
the two sides together.

 I then cut two strips at a little over 12" long.
(final dimensions 12.5" by 1")

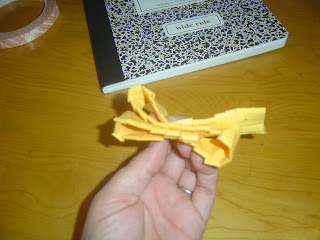
The technique suggests you make small slits about
1/4" to 1/2" apart along the length
of your fabric.
 I prepared a 2" circle for the finished flower to
rest upon and got out some
other supplies I knew I would
be needing for this project.
I wanted to spruce up my fabric
with a little bit of
Olive Green Smooch Spritz first.
I then let that dry, while I began working on
the remainder of my project.

Once you are finished making your slits, and adding smooch if you desire,
 you can then roll the strip inwards to create the flower
and adhere it to you pre-cut circle base.
I placed a large Craft Glu Dot
in the center and pierced it with
the leaf brad you see above.

Before applying the flower, I wanted to create
a "grassy knoll" area on my journal.

The fibers you see here, are a fun
crafty score from Goodwill.
I simply added strips
of the Frost  King adhesive to the bottom portion
of the front of the book.
 I then twirled the fibers into small loops and
pressed down firmly until
the entire area was covered.
I applied my large flower using my glue gun.

I added a bit of the same Smooch Spritz
to some plain white card stock and hung that to dry as well.
The square was about 6 1/4" x 6 1/4" in dimension.
I grabbed a fun frame that I had kept in my scraps, that just happened
to be the same dimension.
The frame was a left over negative space scrap from a
Lacy Labels Cartridge Cut
for a previous project.
This was used as an overlay to my smooched white paper.
I was hoping to have a fun Fall Sky background when I was finished so I could
begin to add my Fall Foliage cuts.

 I used my Serenade Cartridge to cut the fun tree
at 4 1/2" in height.
The leaves were cut from Flower Shoppe Cartridge
at 2 1/2" each.
I sprayed them with some Smooch and inked
the edges with some TH Distress Ink - Vintage Photo.

The alpha stickers are by Webster's Pages and I added some
white jelly pen around each letter for
better  visibility.
 The rhinestone sunburst in the corner was smooched
and sat off to the side to dry
before applying behind the leaf.
I grabbed a bit of other fibers that
I got during the same trip to Goodwill, made a fun
pom pom and adhered this all to the journal
as an attached book marker.
For the inside of my Journal,
I added some yellow card stock and a few Fall stickers 
I  had in my stash.  I thought the fun
label sticker would be a great
place to write in
This Book Belongs To Jessica!

The green piece of card stock peeking out 
was also a left over scrap from a prior Lacy Labels Cricut cut.

I added 2 brown Making Memories eyelets to the 
front cover and back cover of the journal.
I then fed some Cappucino Twinery Twine
through and tied it in a bow.
It is nice to have a closure on your
book if you add elements that make it somewhat bulky
(like my bookmark you see below)

Here is the finished journal.
The title reads
"let the ideas fall"

Thank you so much for stopping by
today.  Be sure to head over to
My Cricut Craft Room
to see all of the other wonderful
projects my DT Sisters
have created.

 
Keep Crafting 
:O) 
Jessica

Sunday, August 19

Letter of the Day - "H"

Welcome to 
Monday's
Letter of the Day

 Today I get to share with you how
I created a Halloween  Theme treat bag,  using
the Holiday Cakes Cricut cartridge 
and some suggestions from Heather to make a 
Haunted House and use some  
Hexagons and Harvest Orange Crinkle Ribbon.

Shwoo...I think I covered the H's pretty well, don't you???  LOL

Thanks for the ideas Heather Lynn!!!
This was super fun to play around with and create!

I started with a simple brown paper lunch bag.  I then grabbed my Unity Hexagon 
background stamp from  the June 2012 Kit of the Month {sweet summer love}
and inked it all over the bag using TH Distress Ink - Black Soot.

I grabbed some American Craft - Damask Specialty card stock to begin
making some fun Halloween Cuts from the Holiday Cakes cartridge.
I have to be Honest and tell you that I was not pleased with How
a few cuts (set at 2") turned out using this paper.  
The intricate details (swirls and small negative spaces) were 
jamming up my blade after starting.    
After struggling several times, I changed the original size of my 
Haunted House up to 4"
and switched a few of my paper choices around for the 2" cuts.
All was not lost!!!
The solid black and solid orange card stock for the pumpkins
on the top are from the AC-Damask papers. 
All of the white card stock you see in this project
is by Recollections and used as a Base Shadow and Plain Shadow 
to emphasize the images made with the darker papers.
The pumpkins were cut at 2" then I applied a coat (using a small paint brush) 
of orange Studio G-glitter glue over top.

The papers for the Haunted House
are from the Cloud 9 Designs Harvest Holiday stack.
The Haunted House was cut at 4".  
After laying down a strip of Martha Stewart Decorative Tape, 
I used 3D foam squares to raise the House away from the bag.
The yellow card stock for the moon is Core'dinations - Sunflower Yellow.
I also stamped and cut a few of the Hexagons out of the matching papers
to be raised with 3D foam and 
applied randomly around the bag 
for extra dimension.

I used the Lacy Labels Cricut Cartridge to create a fold over flap at 
the top of my treat bag. 
I cut the layers at 6" and then used 
my ScorPal to score down the middle of each layer.
(Card stocks used were orange AC Damask and Yellow Core'dinations)
I adhered them together using my GluGlider Pro.
 Before adhering the pumpkins and sentiment,
I added a strip of coordinating Cloud 9 Papers
to the flap of the bag (after it was rolled several times) 
to hide the portion of brown paper bag
that peeked out a bit 
behind the flap when it was closed shut.

I added some 3M Adhesive Velcro to the bag and flap for a closure.

To apply a handle for my bag, I decided
to use two small eyelets by making memories at each end.  
This allowed me to feed some fabulous
Harvest Orange 3 Girl JAM crinkle ribbon
through and tie a nice bow on one side.

 I also strung some Twinery Twine - Charcoal through as well.
I twirled the twine around the Orange ribbon 
so neither would be Hidden 
and both would compliment each other well.

 Here is the close up of the finished flap.

 I also decided to "tassle" more of the Charcoal Twinery Twine
so it could lay above the chimney of the Haunted House
and appear almost like smoke coming out.

I sure hope I thought to share all of the details about my project, 
and would welcome any questions if I have left anything out!

Thanks for stopping by today!

Make sure you stop back over to
see the other wonderful
projects the DT created!!

Keep Crafting 
:O) 
Jessica

Friday, August 3

100 Cartridge Blog Hop- DAY 1

Welcome to Erica's Craft Room 
100 Cricut Cartridge
Blog Hop
Day One

If you just stumbled in and would like to start at the beginning,
head over to  http://mycricutcraftroom.blogspot.com/


Welcome to the
100 Cartridge Blog Hop!

You should have arrived her from the talented Heather Lynn

Collectively the design team uses over 100 different Cricut Cartridges
in their projects during the
two days of this hop.
 
As special treat enjoy 10% off of your total purchase with Erica's Craft Room Store.
Use the code AUGUST to see 10% off of your total purchase (No exclusions)

*****************

For my project today, I chose to work with the following cartridges . . . 
Flower Shoppe Cricut®
Lacy Labels Cricut®
and
Preserves Cricut®

I have had it in my mind a lot lately
that my sweet little boy
will be going into Kindergarten next month.
So I wanted to create a layout
for his First Day of School!

Apple was cut from Preserves® at 2" for all layers
Papers: American Crafts - Specialty Damask CS (Red)
Core'dinations CS (All in the Family~Produce Greens)
Cream colored CS
Black Gel Pen (seeds)
White Gel Pen (doodles)

Ruffle Journaling spot was cut from Flower Shoppe Cricut®
at 3 1/4" (base) and 2 3/4" (top layer)
Papers: Color Me Silly by Basic Grey CS
Blue Textured CS
White Gel Pen (doodles) 


Mat behind Photo spot (Berries)  was cut using Lacy Labels Cricut®
at 6" for both layers.
Papers:  American Crafts - Specialty Damask CS (Red)
School Alphabet DP is a paper pack from $1 section at Target

Tag  was cut  from Preserves Cricut® at 3 1/4"
Papers:  Cream colored CS
Core'dinations CS (All in the Family~Produce Greens)
White Gel Pen (doodles) 

Large rectangle was cut using a trimmer and another
fun DP from the $1 paper pack
and  Core'dinations CS  (All in the Family~Sunflower Yellows)

The sticker/sentiment on the tag and the background paper (notebook)
are both also from the $1 paper pack.

I really enjoy working with sketches and was
super delighted to receive
my issue of Page Maps 2 by Becky Fleck.
The sketch on page 81 offered
me quite a bit of inspiration!!!

Other supplies used:
Zig Pens
Exacto Knife
Quick Quotes Powder Puff Chalk Ink (green)
Tim Holtz Distress Ink, barn door
Stapler
Glu Glider Pro ATG
Red CS (for support)

Now you will hop over to the sweet and crafty Tammy.

Here is the lineup in case you get lost along the way
  1. MCCR http://mycricutcraftroom.blogspot.com/
  2. Jenn Lorist http://www.jennspapercrafts.blogspot.com
  3. Teresa http://www.createenjoyshare.blogspot.com
  4. Kathy http://3spoileddogs.blogspot.com
  5. Shelley http://shelley-scrapbookingforfun.blogspot.com
  6. Heather http://heathernovinger.blogspot.com
  7. Jessica S http://jessicascraftshaque.blogspot.com
  8. Tammy - http://www.Cuttinandstampin.blogspot.com
  9. Jen L http://www.mybusycraftylife.blogspot.com
  10. Erica's Projects http://ericasprojects.blogspot.com/
  11. Samantha http://www.samanthascricutcreations.blogspot.com
  12. Robin http://create-a-latte.blogspot.com/
  13. Amy http://clayfulimagination.blogspot.com
  14. Miranda http://www.nanasscrapspot.com
  15. Angie http://crazyscraplady-angelpie.blogspot.com
  16. LB http://www.coolbeansbylb.blogspot.com
  17. Cathy http://cathyplus5.blogspot.com
  18. Claire http://threewaterscreations.blogspot.com
  19. Lisa Carrier http://ourcraftingcorner.blogspot.com
  20. Blog Candy http://ericasblogcandy.blogspot.com/

Happy Hopping
and
remember to
Keep Crafting 
:O) 
Jessica

Scrapbook Friday ~ "Dream Big"

Scrapbook Friday - August 3, 2012 - Sketch


Hello Crafty Blends.
I am so glad you are stopping by today.
I was so pleased
with the way my next layout turned out,
that I have been cringing to show it to you!
I hope you like it 
as much as I do.

I started with this Sketch
from Erica at My Cricut Craft Room

I love when you can start with a fun
sketch and
your creativity FLOWS on from there 
without any glitches.  

Well . . . . to be completely honest, 
there were a few
minor glitches . . .  
I had a bit of a re-inker explosion 
in the bathroom that left 
my hands looking like I just got done
arm wrestling a Smurf.  
* * * * * 
Then there was the hidden finger daubers
under all of my other crafty supplies 
that were almost impossible 
to find
since my thumb and index finger
 were stuck together 
from the Glitter Glue.  
* * * * *  
Oh, and I tried to take
a break an eat a yummy sandwich in between crafting.  
Let me just say,
it is REALLY HARD to get Italian Dressing 
out from in between
the home-row keys on your keyboard.
! ! ! ! ! LOL ! ! ! ! !

I am laughing, because I took it all in stride, 
and didn't let it stop
me from 
reaching the finish line.

And here is what I ended up With:

 (poor lighting today....sorry)

Base 
Colorbok dp Earth Tones (green pattern)
Unity  Stamps from Apr & Jun 2012 KOMs for the butterfly and flower trios
stamped directly onto dp using Quick Quotes Green with Envy powder puff chalk ink
Opal and Green Glitter Glue by Studio G applied
scrap papers
3 Girl JAM  crinkle ribbon scraps (Baby Boy and Mistetoe)
buttons from stash


Flowers
Colorbok dp Earth Tones  (blue pattern)
Flower Shoppe Cricut Cartridge cuts at 3 1/2
Produce Greens Core Cardstock
TH Alcohol Ink Stream
Handmade Glimmer Mist
buttons and pearls from stash

(more supplies are listed below)

 Here is a close up that better shows the colors I worked with on my layout
Large Mat
Produce Greens Core Cardstock
Blue textured cardstock
Shapes cut from Lacy Label Cricut Cuts
Large mat cut at 8", trimmed and inked with Dew Drops Metallic Platinum,
then embossed with  Darice embossing folder - Flower Swirls 
(I lightly sanded the outer "frame" by hand and sprayed some Perfect Pearls for a bit of glisten)
Smaller 2 mats cut at 3 1/2" then inked with Dew Drops Metallic Platinum, used
Unity  Stamps from Apr & Jun 2012 KOMs for the butterfly and flower trios which
are stamped directly onto mats using Quick Quotes Green with Envy powder puff chalk ink
3 Girl JAM  crinkle ribbon bows (Baby Boy and Mistetoe)
were created using the 3 Girl JAM Bow Maker

Photo Mat: DCWV  - The Luxury Stack 4.5"x6.5" cut to fit
and inked around edges using the QQ Green ink again


Flower Trio (lower right corner)
Unity  Stamp from Apr  2012 KOM 
stamped onto blue textured card stock using  Dew Drops Metallic Platinum
fussy cut (2 layers) then used one pop square behind petals and glued stems together with Zip Pen
applied a bit of Opal Studio G glitter glue
Title
Created using white Chipboard  stickers that were
altered using Darice Stream Blue and QQ Green ink.
The other square alphas were in my stash
I outlined the title for contrast
using a Whisper Strokes Dual Tip Watercolor Marker

OTHER SUPPLIES:
Glu Glider Pro ATG Gun
Zig Pens
Exacto Knife
Trimmer
Scissors
Glue Dots and Zots
Paint Brush


Now, if you want to see more fantastic
layouts
be sure to stop over
at 
My Cricut Craft Room
to check out
what all the other DT Members 
have in store for you!!!

 THANKS FOR STOPPING BY
&
Remember,
Keep Crafting 
:O) 
Jessica

Saturday, June 30

June Sketch Blog Hop Day 2

**************

Here is the link to the Beautiful Bows Blog Hop with 3 Girl JAM

**************

If you missed Day 1 of the Sketch Hop,
just be sure to stop over at Jennifer's Blog so you don't miss
yesterday's fabulous projects!

Welcome to
DAY 2
of the 
June Sketch Blog Hop

Everyone had so much fun doing these,
it has turned into a regular event.

The purpose of this hop is to show you
how all of these talented bloggers
can take the same sketch
and come up with totally different cards.

If you have never used a card sketch before, give it try!
Our hop focuses on this fabulous sketch!
  
If you arrived here from Ashley's Blog, then you are on the right track.
However, if you just stopped in and would like to start from the 
beginning, please hop over to Jennifer's Blog.
Enjoy the Hop!!!

Here is my card for today

I started with Core'dinations Pearl CS - Yellow as my base
I also used AC embossed cardstock in a sunflower yellow
I used dp from my BG lauderdale 6x6 paper pad
I cut the center shape and sentiment from Lacy Labels at 3"
The small squares were trimmed to 2 3/4" x 2 3/4"
I added some roses, bling, and orange Studio G glitter for accents as well
as doodling a bit with my white jelly roll pen


Now you will hop over to Kristy
Happy Hopping
and
Remember
to
Keep Crafting 
:O) 
Jessica

Social Butterfly?

Charity Wings

100% Certified

100% Certified
BAD A$$ Facebook Fan Page

Bill of Rights

Photobucket

Thanks Deb

Recent Visitors