Friday, October 12

♪ Showcase at the Shaque ♪ Amy England


Are you looking for the
Boo Whoo Blog Hop ?
CLICK HERE

******************

OCTOBER 2012


 On the 13th of each month, I will be inviting a Guest to
SHOWCASE at The Shaque!
There will be a series of 13 questions that they will answer
in hopes to make new connections 
across Cyber Space and Blog Land 
as well as teach you a few fun facts about themselves 
that you may not know.

For today's Guest, I am honored to have my fabulous Blend,
Amy England

Please join me in Welcoming Amy and leaving her some love!!!


1.
What’s your name?

Amy England


2. What is the name and link of your blog?  How long have you been blogging? 


button


My first post was on May 6, 2011, but I was writing for other people's couponing blogs for several years before that.  
Extreme couponing was kind of my introduction into the blogging world. 
(Yes, I was one of those crazies that got almost all of our groceries and household items for free!)


 3.  What is your favorite craft to work with (type, technique, style)?


Absolutely paper crafting as a whole.  That being said, everything is ever-changing with me.  I started as strictly a scrapbooker, and then learned card making.  Cricut was my big focus, but I've evolved into stamping, coloring, and working with inks making backgrounds.  I used to paint in oils, and am slowly moving back that direction...but just on paper and with ink instead!


4. Do you have other hobbies?


I've been a musician all my life.  I've played guitar for nearly 40 years and used to sing professionally (MANY years ago!)  Music was my first true passion.  I've  also dipped into painting, sewing, cake decorating, volunteering for local schools and charities, teaching guitar and/or voice, couponing, and photography...just to name a few!! 


5. How did you get started in the Craft World?

 
I can't really pinpoint it, since it's always been a part of my life.  I was always in some sorts of arts and crafts class in school, I got into sewing clothes for my kids when they were little (I still have the dress I made for my daughter's first Easter...it took one yard of material, six yards of lace, and seven yards of ribbon!) I started painting while watching Bob Ross on PBS (raise your hand if you remember him!)  Eventually, I went to a craft night with a friend at her church and watched them scrapbook.  That was probably 5 or 6 years ago, and I've been hooked ever since!

6. Where are you from? 

 
That's a trick question!  I live in Seattle but have lived all over the country.  Here's the Cliff Notes:  I was born in Georgia, then...TX, GA (again) Canada (BC) WA, CA, CO, NM, CT, TX (again) NM (again) and WA (finally!)  I went to 14 different schools if that paints you a picture!

 
7. If you could give a tip to a new crafter/blogger, what would it be?


First and foremost, believe in yourself and what you're doing.  Art is very personal, and you should never allow anyone to tell you that what you're doing isn't correct.  As far as blogging is concerned, write about what you love, and post often!  I've learned that people will actually come and read what you have to say, but only if you give them something TO READ!


8. Name some things that you have learned this year, that you are glad  you  learned?


Craftwise: I've learned how to stamp and color...mostly with watercolor pencils and a water pen.
Blogwise: I'm learning how to grow my blog and make it my passion.  I hope to be able to turn it into a career one day.
9. Do you have anything personal you wish to share with the readers?
I could write for DAYS about my family, but I'll give you the short and sweet version.  I have two grown children who are the light in my life.  My son and his extraordinary wife live in Texas and work at a Medical University. They're both happy, healthy,successful, and in the process of adopting a baby!

My daughter graduated high school and community college on the same day!  She went on to earn her BA at 20 years old, and has been in her dream career for the past 5 years at an incredible place called the Abused Deaf Women's Advocacy Services.

My husband is simply the best.  Period.  Sorry ladies!  He's a three time cancer survivor, and the strongest, most positive person I've ever known.  I look at him every day and wonder how I got so lucky.  

10. What are your future ambitions?

Personal: to get a severe neck injury fixed so I can start doing more in life!
Professional: to take my blog to the next level and eventually turn it into a career.
Crafting: Ummm...to get my son and DIL's wedding scrapbook finished, since they've been married now for 2 1/2 years!

11. What challenges have you faced, but conquered in crafting?


Learning to color is the most current one.  Now my next challenge is to get on a Design Team...any takers?!?!  Ha ha!
 
12.  When told you would be interviewed for this Guest Post, what
question were you hoping to be asked?


Oh my goodness, I hadn't thought about it, but I was hoping to be able to work bragging about my family in there somewhere..and I did!  I guess it would be, tell me more about how you got your craft room for FREE!!!

13.  What answer would you give to the unasked question? 

Well, of course!  I always love to talk about that!  I have some neighbors that are great at building and design.  They also like to go on frequent vacations but have three HUGE dogs at home.  We decided to trade dog/house sitting for a craft room!!  In exchange for my keeping an eye on things for them and hanging with their dogs, they designed and built me my dream craft room.  They put in new flooring and special art lighting, redid electrical outlets, built me a custom L shaped 14 foot long desk, custom built the paper shelf of my dreams, and even made me a Dutch door so that I can keep my dogs away from the craft stuff, yet they can still hear and see me and not stress out that I spend ALL my time in my room!  


Here's a link to the post about my room, if you're interested in checking it out!


I would love to take this opportunity to say THANK YOU JESSICA!!!  Not only have you built a fun virtual place for us to come hang out, but you've taken a key role in helping to promote our crafting/blogging community to the next level!!!  We all love you dearly!


Here are the wonderful projects Amy is sharing
for her Showcase at the Shaque


Isn't this a wonderful altered planner?
We all know how much I enjoy
altering notebooks, so Amy is after my own heart with this project!
And, to boot, she used Purple > My Favorite Color EVER!
You can read all the details about
this wonderful creation
~ HERE ~


Isn't this fantastic???  I love the wonderful pictures
she placed on the front and who
can resist that handmade
flower on the front.
I just have to share some
other pictures
of the inside too


Be sure to stop over and
watch the fun video Amy put
together
to highlight this gorgeous Address Book
~ HERE ~


Then stop over to Amy's Blog to 
peek at ALL of her
creative talents!

* * * * * * * * * * * * * * * *

Thank You
to  AMY
for being 
my October Guest
on
Showcase at the Shaque
13 Q&A's on the 13th

I hope to have a guest on the 13th of every month
and would love to 
have my Blends join me.
If you are interested in being 
Showcased at the Shaque
please send me an email at strgazrblueyes22477@yahoo.com
with the following details:
1. Your name and Blog address
2. Which months work for you to be showcased (at least 3 top picks)
{right now I am accepting Guests starting as soon as December}
3. A picture of a NEW project you have created
to share on your Showcase Post
4. Any questions or comments you may have regarding this opportunity
5. Please put Showcase at the Shaque in the subject line of your email
:O)
♪  ♪  ♪  ♪  ♪  ♪  ♪

AS
ALWAYS,
REMEMBER
to
KEEP CRAFTING
:O) 
Jessica S


Thursday, October 11

Scrapbook Friday - World Teacher's Day

Welcome to 

 Today is my day to be a featured 
Design Team Member
at
My Cricut Craft Room

The theme of our layouts
had to relate to
World Teacher's Day.

This gave me a wonderful opportunity
to make a layout
for Lance Jr.'s Kindergarten Teacher, Mrs. Campbell.

Lance was excited over the summer to go to school, 
but as the first day drew near, he began to feel
a little nervous and stated he "didn't want to go".

After the first day of school, seeing his classroom, 
meeting his teacher, and seeing all
of the other young children,
he hasn't looked back again.

Each day he comes home to tell a story of what
fun Mrs. Campbell had planned for them today
and for the rest of the week!

She has truly turned his nervousness into anticipation
 to return each and every day!
 
My layout was created on an 8 1/2x11 piece
of Recollections Card Stock using a
wonderful sketch by Becky Fleck, from Page Maps 2.

I also used some papers from the $1 bins at 
Target along with K & Company cardstock - Lion Sleeps.
The other papers were all scraps
The frame around my sons picture,
was cut from Graphically  Speaking at 5 1/2".

The fun title word SCHOOL was also cut from Graphically  Speaking, but
at 1" and on blue card stock.

 
 I cut several apples from Doodlecharms at various
sizes (1", 1.25, 1.5", 1.75", and 2").  However
I only used 3 out of the 5 that were cut.
 The report card stamp
is from a Unity Stamp Co. Set called smarty pants
and
I added some stickers by Authentique
The other stickers
in the title are from the same $1 set 
I purchased at Target.
A little Tim Holtz Vintage Photo around the edges
 to finish it all off.

Thank you for stopping in
today and be 
sure to hop
over
to
My Cricut Craft Room
to see all of 
the other Design Team Members
Fabulous Projects
for Scrapbook Friday!

Remember 
to 
Keep Crafting, 
Because 
♫ CRAFTING ♫ ♫ ROCKS ♫ 
\m/-_-\m/ 
:O) 

Jessica


Wednesday, October 10

Get Ready to VOTE - for your FAVORITE Master Crafter!!!!


Please scroll down 
or Click HERE 
to see
my 3 Girl JAM DT Post
Seeing Stars with 3 Girl JAM and Teresa Collins


***I AM SO EXCITED***
VOTING WILL BE OPEN 
from 10/07/12 until 10/11/12
AT 11:59 p.m. CST
(The slight change in plans to begin voting was made in order to give everyone
time to link up their projects first)

Come One, Come All
and
show your love
to  ALL of the Talented Participants
during the 

Back in August,
announced 
the 1st ever, Pink Cricut
Master Crafter Challenge
and
IT   ALL   STARTS   TODAY!

To read more about the idea behind the challenge
visit my previous post HERE
where I shared how it all started and
get a peek at all of the Wonderful Sponsors
for the event!


NOW, time to share my
Master Crafter Challenge Project!
I decided to go ALL OUT
and create an entire
Party Decor Set!

I was thrilled with how many of the
Secret Box items I was able to incorporate
into the different pieces
of the set!
On top of that, I used a lot of left over
scraps and tons of Negative Space "scraps"
from several of my Cricut Cuts.
**I will share underneath the pics,
the Secret Box Items that were used!

If you are interested in learning more about
the specific details on how I created
each piece,  JUST ASK!!! 
:o)
This is the entire Party Decor Set


Left Side View
 
Middle View
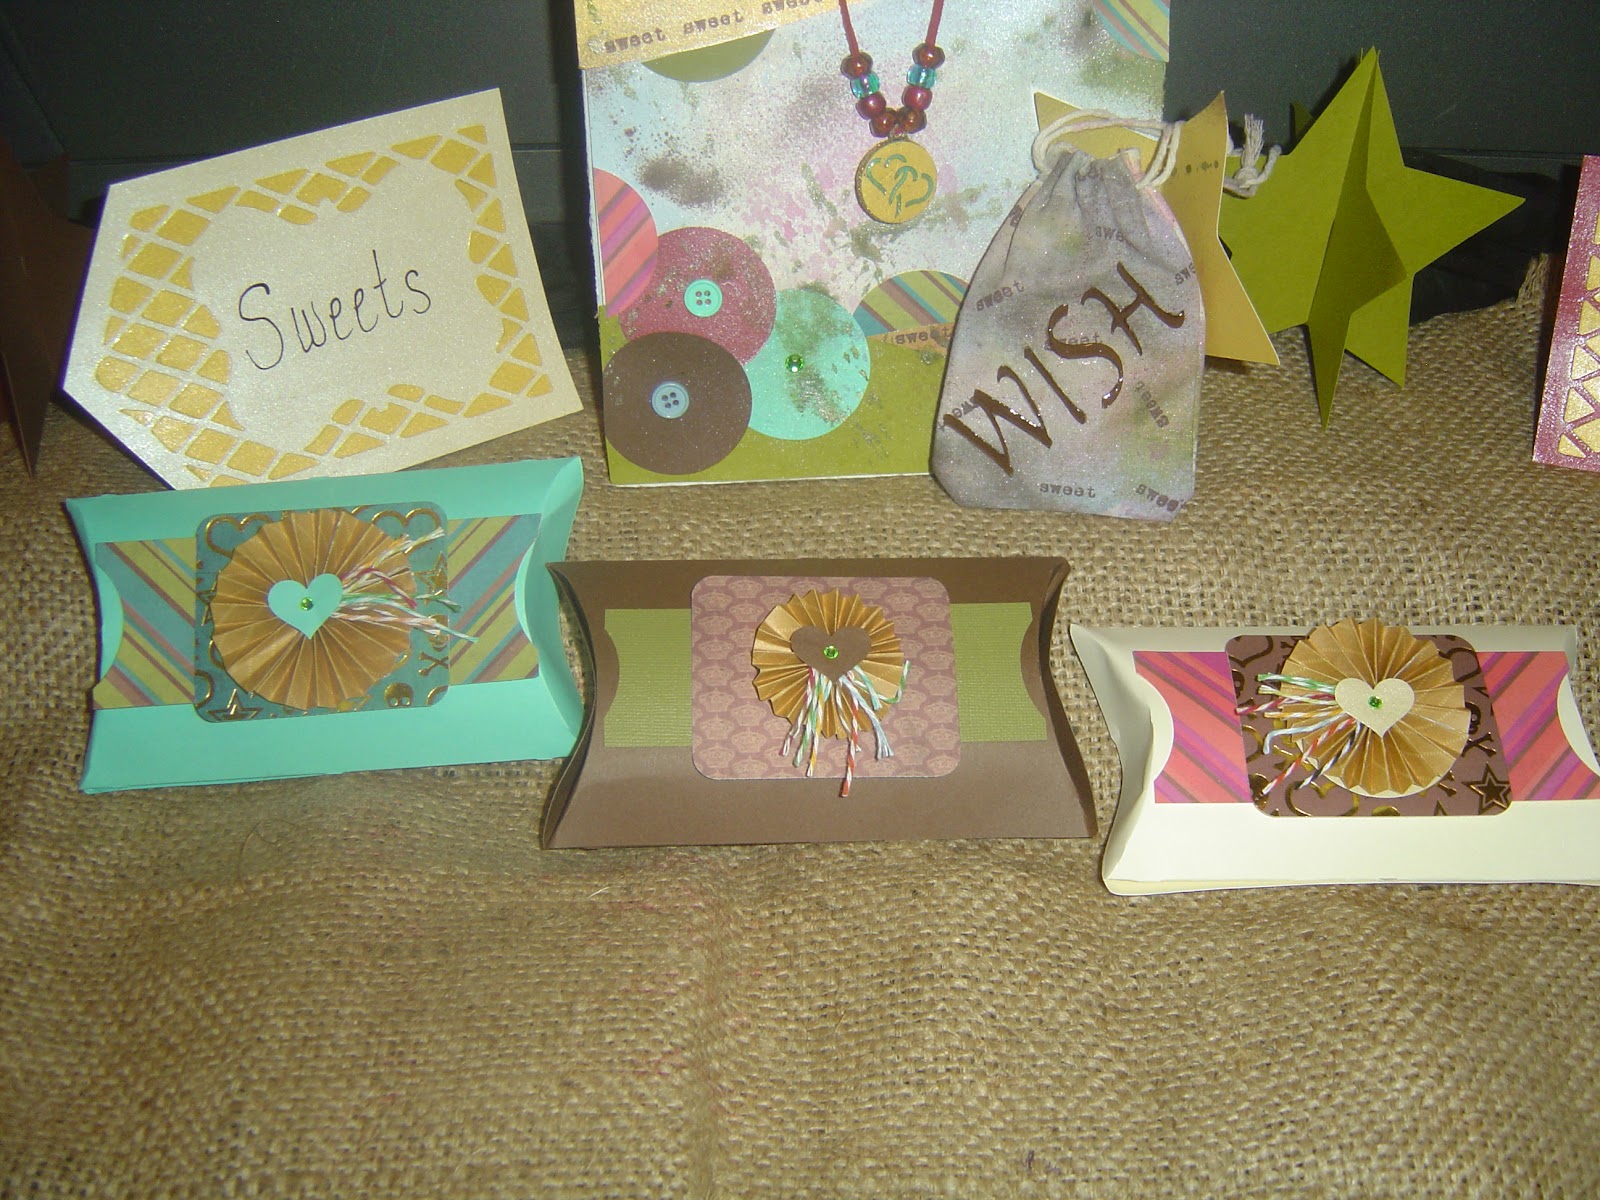
The font used for WISH on the Banner and
Muslin Bag were cut from the Jasmine Cricut Cartridge.
For the banner, I cut the letters at 3".
For the Muslin bag, I cut them at 1 1/2" and added
a layer of glossy accents (and let dry)
 before adhering them to the bag.
Right Side View
The 3D Stars were cut at 5" from Tablescapes - Spring and Summer Cricut Cartridge.
The food and drink signs were created with the
negative space from the Banner top layers.
I adhered the small pieces to coordinating card stock, then
covered it entirely with a light coat of Mod Podge.
Once it dried, I was able to hand write the food names on the signs.
I then created a table tent from a 4"x12" piece of cream card stock
to hold the signs upright.

This is a handmade "Mixed Media" Jewelry Stand
(made from cardboard and scraps),
a Handmade Necklace
(created from one metal charm, two hand punches, card stock,
beads, and Glossy Accents),
and a Wish Bag.
I played around with some handmade Glimmer Mists, Smooch Spritz, and Glossy Accents
to create the color wash effect and lettering on the cute little bag.
I also used my Pink By Design stamp -
the sentiment  "sweet"
in multiple places on these both of these pieces.

My thought was that the necklace could be
presented in this bag as a Gift!
For these two projects in the Party Set
I was able to  use
ALL of the Secret Box items!
The papers for the mixed media piece
were all scraps left over from cutting with my Scissor Mouse, hand punches,
and a leftover star which was cut at 5" using my
Tablescapes - Spring and Summer Cricut Cartridge.

These Pillow Boxes were created using the
Scissor Mouse
DCWV Rockstar mat stack
and
Lime Green Rhinestones.
The pillow boxes were cut at 5" from 
Tablescapes - Spring and Summer Cricut Cartridge


 I wanted to have a fun place for
all the Party Guests to Sign In!
I used
DCWV Rockstar mat stack 
Rhinestons
The gold tag with the sentiment "Guest List"
was an actual left over negative space from the
top layers of the banner you see below.
I also used my corner round in a few spots!

I really adore how this Banner turned out!!!
The 4 Letter Panels were created
using the DCWV Rockstar Mat Stack.
I used the Pretty Pennants Cricut Cartridge for all panels and spaces seen here.
The Panels were cut from Banner 2 and Layer (Sign) at 6".
I also used some Core'dinations Golden Pearl card stock.
The spaces were cut from Banner 4 and Layer (Hndstoth) at 2"
using Cream card stock and Core'dinations Scarlet Pearl card stock.

Another angle of the Pillow Boxes...
this is the first time I ever created
Pillow Boxes, and I really LOVE making them!
I used my corner rounder , heart punch and Scissor Mouse for
the paper layers and rosettes on these.
I also used over some leftover snippets of Twinery Twine.

♫ ♪ ♫  ♪ ♫ LET'S GET THIS PARTY STARTED ♫ ♪ ♫  ♪ ♫

Head over
to the Pink Cricut Page
 -HERE-
to check out all of the
PHENOMENAL
Projects that are being linked up.

Then be sure to head back over to
Pink Cricut - Master Crafter Challenge
on Sunday 10/7/12,  to cast your votes!

PLEASE ~ Don't vote for me,  JUST because
you heard about the contest here.

! VOTE FOR YOUR FAVORITE CRAFTY PROJECT!  
That is the whole point of the Challenge isn't it?!?!

Voting ends October 11th at 12:02 am CST.


HOPE TO  
SEE YOU  
ALL THERE!!!

Remember 
to 
Keep Crafting 
:O) 

Jessica


Tuesday, October 9

Seeing Stars - with 3 Girl JAM and Teresa Collins

Today is my day as a Featured Designer
at 
and 
as I always share
how super excited I am
to play with all of the 3 Girl JAM
products available,
this project is no exception!!!

And don't forget to link up your
Anything Goes (w/ Ribbon) Projects
to the
3 Girl JAM #4 Challenge

I also want to mention, that I received a wonderful gift
from my dear friend  
for helping her organize and host
her Birthday Blog Hop
last month. 
This is the first chance I got
to play with the wonderful
Teresa Collings - Sweet Afternoon 
papers and embellishments
she had sent to me from 
THANK YOU SO MUCH CHRISS ! 

To begin, I created some fun 
3-D stars using my Tablescapes -Spring and Summer 
Cricut Cartridge.
I used medium grade chipboard 
and cut the stars at 5".

After cutting them with my deep cut blade in my Cricut, 
I had to sand down the rough edges
and create a wider slit for the thicker
chipboard to fit better together.
I just used a utility knife to cut the slits wider.
I had a total of 4 - 3D stars (2 pieces per star).
I painted the outer edges of my stars 
with coordinating colors of Acrylic Paint
in Pink, Yellow, and Blue. 

 While my paint was drying,
I then cut my stars 
from the gorgeous 
Sweet Afternoon papers, 
again at 5".
 
Keep in mind, the papers are a double sided card stock, so
there is a coordinating design on the back of each
of the papers below.  Both patterns will show on the 
finished project.
In order to cut enough to cover all sides of my stars,
I ended up with:
4 stars using At The Picnic

4 stars using  Flying Kites


4 stars using Just Relaxing

4 stars using Going Downtown


I wanted to get out as much 3 Girl JAM product as possible
to use on this project.

I gathered a few coordinating colors of Crinkle Ribbon
Along with a few matching
resins, bling and other embellishments.

Here are the stars after being covered
with the beautiful papers. 


I originally planned to pleat the crinkle ribbon
along the inner corners of each star.  But that proved to be quite
difficult when I tried to use my ATG gun.
So, I improvised by twirling the ribbon
and using some Glue Dots and Zots
to line the inner corners instead.
I used the following colors of 3 Girl JAM Ribbon
Baby Girl Pink
Baby Boy Blue
Antique White
Sunflower Yellow
and
Christmas Candy

After decorating all of the stars with bling, embellishments and
more crinkle ribbon, it was time to start stringing them to the
"hanger" I created.
I cut an old cereal box into a scallop flower using the Cricut Classic  Font
cartridge at 11", then cut two of the same size scallop flower
from pink card stock.

I added some eyelets
to feed the fishing line that would hold my stars, through
the hanger.  I wanted to dress it up a bit and added a few
die cut hearts and satin pink flowers.

I thread the fishing line through the top point of each star, strung some
glass beads, then tied a knot above the beads.
I again tied a knot before adding a single clear bead and fishing the line through
the hanger.


I made each strand vary in length (13", 12", 11", and 10") so that
they weren't all hanging amidst each other.

Got a few of the close up pics to show
the detail of each star.

Each panel is uniquely embellished
and with tons of different
types of bling, flowers, stickers, and chipboard.


Thank you so much for stopping in today
and
be sure to stop over to
the
3 Girl JAM Blog to stock up
on all the inspirational projects and creations
that have been shared
by all of the Design Team members
and Guest Designer.

Remember 
to 
Keep 
Crafting 
:O) 
Jessica

Monday, October 8

WCMD with UNITY STAMP CO. - #2 Texture Challenge

Wow, how I have missed playing
with my Unity Stamp Co. Stamps.

My second card for the night is now completed.

I am linking up to the fun celebration for
World Card Making Day
at their wonderful

I moved on to the
It's All About Texture Challenge (#2)
for inspiration to create.

I grabbed my Teresa Collins 6 x 6 stack - EVERYDAY MOMENTS.

I decided to do some fun die cuts with my Big Shot.
I  used my Provo Craft Leaf Die, my Flower (Build a Lilac) Sizzix Die,
and my Spellbinders Nestabilities - Lacy Squares.

For some added texture to my project,
I decided to do more embossing using my Ranger embossing pad,
Ranger UTEE, and
some Blue Denim embossing powder.

Of course I had to use a new to me, never used before,
Unity Stamp set called
Better with Love by Echo Park


I adore those beautiful roses.
I really think the UTEE gave my background roses a fun
contrast to the darker colors on the focal image of my card.

I still needed more texture. 
 So I grabbed my 3 Girl JAM  burlap
and an old collar of a t-shirt that had
fallen apart from the shirt just the other day...
(I knew I would be using that...LOL)
 I was really impressed how well the small
flowers, from the Sizzix  Lilac Die, cut into the burlap.

I pleated the collar under the center image,
added the leaves and flowers
all around the card
then used brads and bling
for the centers of my flowers.

I hand cut the sentiment flag
after inking it with some VersaMagic - Jumbo Java


Thank You so Much for stopping in
to see my card and I sure hope you enjoyed it!
Remember 
to 
Keep Crafting 
:O) 

Jessica


Social Butterfly?

Charity Wings

100% Certified

100% Certified
BAD A$$ Facebook Fan Page

Bill of Rights

Photobucket

Thanks Deb

Recent Visitors